
PWM Duty Cycle
This post will demonstrate how to use Pulse Width Modulation (PWM) on the Raspberry Pi with Python programming. PWM is often used to control motors including servo motors used in robots and automation, lights and other electronic devices.
Digital output is either on or off. It cannot vary between on and off as analog output can. If an LED or motor is connected to a normal digital output, it will only operate at full on (output on) or full off (output off).
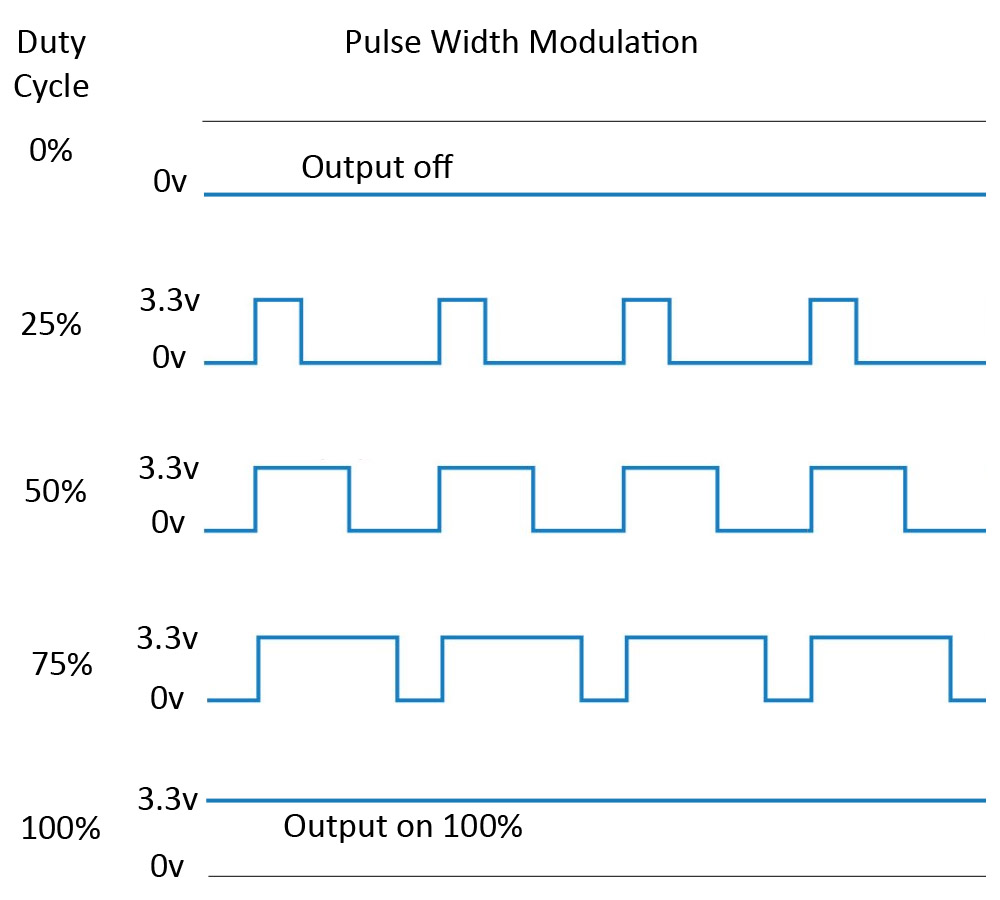
With the use of PWM, we can simulate varying levels of output energy to an electrical device. At any given time, the digital output will still be on or off. But, we can pulse the output with varying widths to control the amount of effective output. Shorter on cycles compared to the off cycle will deliver lower overall output. Longer on times relative to the off time deliver higher overall output. This relationship between the on and off duration is called “duty cycle” and is measured in percent of on time compared to the off time. Thus a 25% duty cycle will have an on time 25% of the total cycle with 75% off. A 50% duty cycle will have equal on and off times. With PWM we can vary the duty cycle from 0% to 100%.
To demonstrate PWM on the Raspberry Pi, first connect the Pi GPIO pins to an LED as shown in the diagram below. The longer lead is the anode + and connects to an 270 ohm resistor (or near 270). The slightly shorter lead of the LED is the cathode and connects to ground, pin number 6 of the Raspberry Pi (3rd pin from left on outside row). The resistor connects to Pi pin number 12 (6th pin from left of outside row).

Raspberry Pi PWM connections
We can now use Python to configure Pi’s pin number 12 for PWM and then vary the duty cycle. To demonstrate the varying duty cycle we will vary pin 12 from 0% to 100%. This will cycle the LED from full off to increasing levels of brightness until full on. Then we will reverse the cycle from full on and dim the LED until full off, and repeat.
Following is the Python source code used for this demo. You can install the program in either of two ways.
A. Key the source code below into Raspberry Pi’s Text Editor. Save it into the Pi folder as pwm-led.py
B. If the Pi is connected to the internet, you can download it from our website as follows.
- Launch the Terminal program (command line interface)
- Type: wget -O /home/pi/pwm-led.py https://www.mbtechworks.com/files/pwm-led.py
#  MBTechWorks.com 2016
#  Pulse Width Modulation (PWM) demo to cycle brightness of an LED

import RPi.GPIO as GPIO   # Import the GPIO library.
import time               # Import time library

GPIO.setmode(GPIO.BOARD)  # Set Pi to use pin number when referencing GPIO pins.
                          # Can use GPIO.setmode(GPIO.BCM) instead to use
                          # Broadcom SOC channel names.

GPIO.setup(12, GPIO.OUT)  # Set GPIO pin 12 to output mode.
pwm = GPIO.PWM(12, 100)   # Initialize PWM on pwmPin 100Hz frequency

# main loop of program
print("\nPress Ctl C to quit \n")  # Print blank line before and after message.
dc=0                               # set dc variable to 0 for 0%
pwm.start(dc)                      # Start PWM with 0% duty cycle

try:
  while True:                      # Loop until Ctl C is pressed to stop.
    for dc in range(0, 101, 5):    # Loop 0 to 100 stepping dc by 5 each loop
      pwm.ChangeDutyCycle(dc)
      time.sleep(0.05)             # wait .05 seconds at current LED brightness
      print(dc)
    for dc in range(95, 0, -5):    # Loop 95 to 5 stepping dc down by 5 each loop
      pwm.ChangeDutyCycle(dc)
      time.sleep(0.05)             # wait .05 seconds at current LED brightness
      print(dc)
except KeyboardInterrupt:
  print("Ctl C pressed - ending program")

pwm.stop()                         # stop PWM
GPIO.cleanup()                     # resets GPIO ports used back to input mode
Note, this is Python 3 source, so we will use Python 3 to run the program. To run the program, type the following command into the command Terminal.
sudo python3 pwm-led.py
The LED should cycle between off to on to off and repeat the cycle until you press Ctrl c.


