
Blinking LED for Raspberry Pi
GPIO connections
The Raspberry Pi has a great interface capability through its GPIO (general purpose input / output) header pins. This article will show how to make an LED light blink. While very a simple, this is a good introduction to using the GPIO and the Python programming language to control it.
Parts required:
- Raspberry Pi
- LED
- 100 ohm resistor
- Female to male jumper wire
- Breadboard
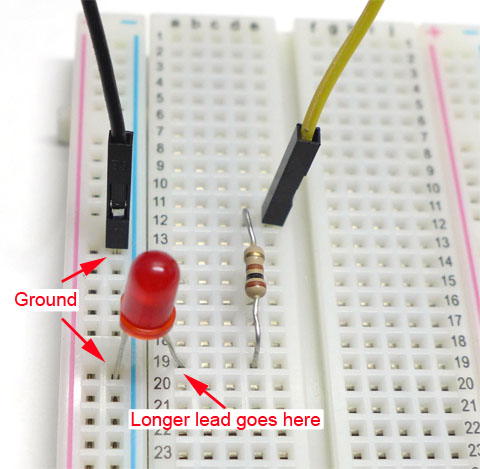
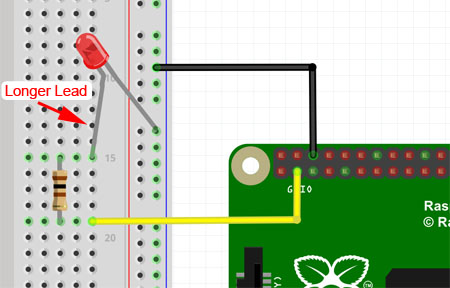
Insert the 100 ohm resistor as shown in the image above. Insert the LED to the breadboard with the longer lead on the same row as one end of the 100 ohm resistor. LED’s have an electrical polarity which requires the current to flow in a specific direction in order to work. Connecting the LED incorrectly (backwards) may damage it. With the longer lead on the 100 ohm row, insert the shorter lead on any socket on the outer column.
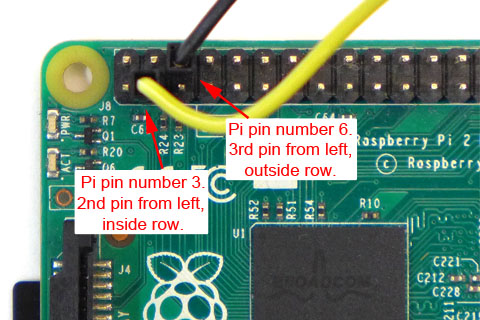
Insert the male end of a jumper wire in the same outer column as the short LED lead (the black wire in image above). ;This is the ground. Connect the female end of the ground wire to the 3rd pin on the top row of the GPIO.
Connect another jumper wire from the 2nd pin of the lower row of the GPIO. The male end of this wire is inserted to the breadboard on the row at the other end of the resistor.
Blinking LED connections
Now for the programming. Launch Python 3. From the Python menu, click File, then New to create a new “source” file. Type the following Python code into the editor. When done, click File, Save and give it a name like blink-led.py.
#  Blinking LED

import RPi.GPIO as GPIO   # Import the GPIO library.
from time import sleep    # Import the sleep function from the time library.

GPIO.setmode(GPIO.BOARD)  # Set Pi to use pin number when referencing GPIO pins.
                          # Can use GPIO.setmode(GPIO.BCM) instead to use
                          # Broadcom SOC channel names.
GPIO.setup(3, GPIO.OUT)   # Set GPIO pin 3 to output mode.

delay = .1                # Set variable "delay" to .5 seconds
                          # Try changing this value to .1 or .2 or 1, etc.

print("\n\n")             # Print 2 newlines (blank lines).
print("Press Ctrl C to end program or wait until the loop completes")

i = 0                     # Set variable i to 0.
try:
  while (i  <  50):         # Run the indented code for 50 times until i reaches 50.
      GPIO.output(3, True)  # Turn pin 3 on (LED on).
      sleep(delay)          # Sleep while LED is on.
      GPIO.output(3, False) # Turn pin 3 off (LED off).
      sleep(delay)          # Sleep while LED is off.
      i = i +1              # Increment variable i by 1.
except KeyboardInterrupt:
  print("Ctrl C pressed - ending program")

GPIO.cleanup              # Resets GPIO pins back to default state.
print("\nProgram finished\n") # Note use of \n to create blank lines
                              # before and after "Program finished"
Once the file is saved, click the Run menu, then Run Module, or simply press F5. The program will run in the Python Shell. If everything is connected correctly and the code is without error, the LED should blink steadily for 50 times! Try changing some of the values in the Python code.


