
Why Python?
The Python programming language is very popular today - with good reason.
- Python is easier to learn, read and maintain than many other languages.
- Its core is simple and concise.
- Many libraries are available to extend its capabilities.
- It is an interpreted language, meaning that a separate compile or build is not required.
- An interactive mode permits testing of small pieces of code.
- It is supported on multiple platforms including Windows, macOS and Linux (including our beloved Raspbian!).
- There is an enormous user community for support and help.
- Python can scale from small and simple to large and complex programming tasks and projects.
- And, . . . it's Free!
A simple example:
a = 5
b = 10
sum = a + b
print(sum)
How to Create a Python Program
Methods for writing Python source code vary depending on the platform and code editor used. We will use Python 3 IDLE (Integrated Development and Learning Environment) included in the Raspbian operating system. (Note, Python 2 IDLE is also available for version 2 legacy Python code, but the two versions are not completely compatible.)
After booting to the Raspbian operating system on your Raspberry Pi, launch Python 3 (IDLE) from the Programming menu. This runs the Python Shell from where you can control the Python editor and functions.
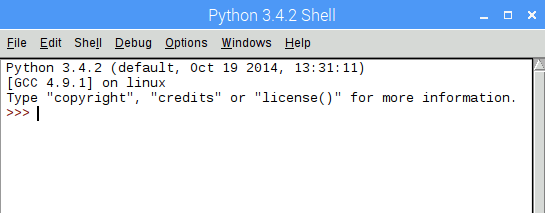
Python 3 Shell
From here, one can enter and run small snippets of Python code as well as create a new Python source code file. First, let's try running a couple of lines of Python interactively. At Python Shell prompt, enter the following and then press the Enter key.
print("Hello World")
The line of code is run interactively when Enter is pressed and will print (display):
Hello World
Let's try some more, perhaps a couple of simple math examples. Enter the following two examples and press Enter after each line:
print(15 + 20)
35
This first example will calculate the sum of 15 + 20 before printing the result of 35.
Next type the following and press Enter after each line:
x = 15
y = 20
print(x + y)
35
This second example will assign the value 15 to variable x and the value 20 to variable y. Then it will calculate the sum of x + y and print the result! Cool.

Python 3 Interactive examples
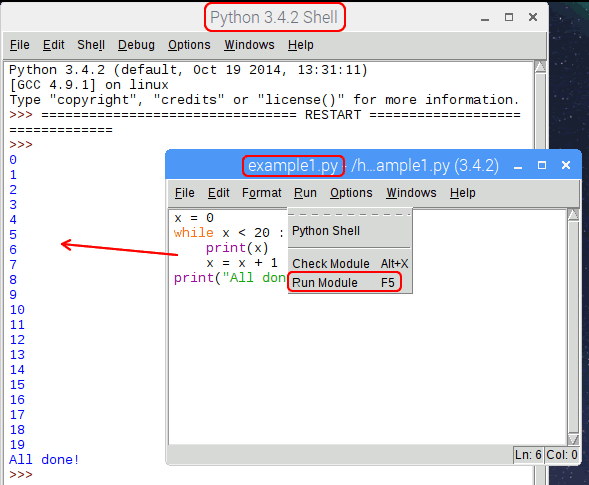
One last interactive example before we move on. The following will demonstrate a "while loop" within Python (more about loops further below). Key the following, and again, press Enter after each line. The lines below the while statement will indent automatically, you do not need to space the lines to get the indentation.
x = 0
while x < 20 :
  print(x)
  x = x + 1
After entering the last line, x = x + 1, press Enter again to interactively run this block of code. Let's analyze this program, line by line:
- The first line assigns a value of 0 to variable x
- The while statement in the second line starts the "while" loop. Everything indented below a while statement will run and repeat as long as the test (to the right of the while) x < 20 is true. Once the statement is no longer true, the while loop ends.
- The third line prints the value of x, which is initially set to 0 in the first line x = 0.
- The fourth line increments the value of x by adding 1 to x and assigning the result back to itself, x.
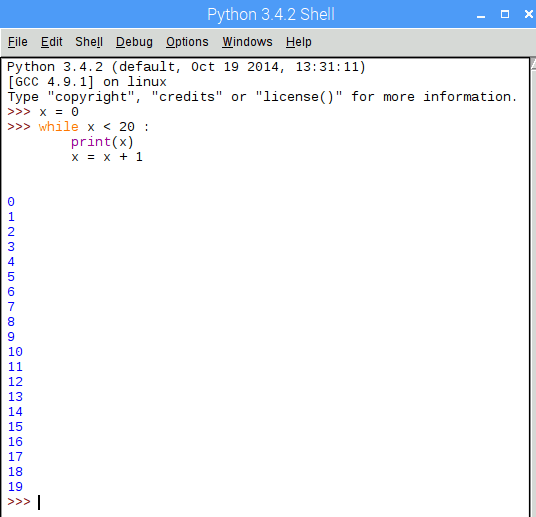
Python 3 While loop example
Create and Run a Python Source Code file
So far we have run our Python examples interactively from the Python Shell. Now let's create a Python source code file. We can then run the saved file from the Shell, or from the command line terminal. We will show both ways.
Create Source File - Run from Shell
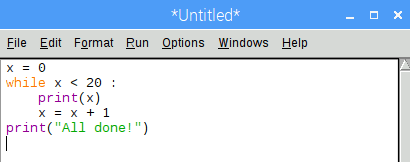
From the Python Shell (launch from Raspbian Programming menu if not already open), click the File menu, then New to open another window where you will enter your Python source code.
Let's key our while loop example from above, save it, and then run it from the Shell. Type the following example into the open file:
x = 0
while x < 20 :
  print(x)
  x = x + 1
print("All done!")
We added a line to print "all done" to our simple example. After pressing Enter after the x = x + 1 line, Python will automatically indent assuming there is more to the while loop. Since, we don't want the last line inside the while loop we backspace to outdent (move the line to the left). Indentation Python controls the parts of Python that go together. If the print("All done!") line were indented under the while statement, it would be part of the while loop and print "All done!" every iteration of the loop! By moving it out so it is not indented, it tells Python that this line belongs to the main part of the program and is not part the while loop. Proper indentation is very important in Python and is often the cause of program "bugs" if not done properly.
Tip: checking indentation is one of the first things when a program isn't working as expected.
Python source code file example
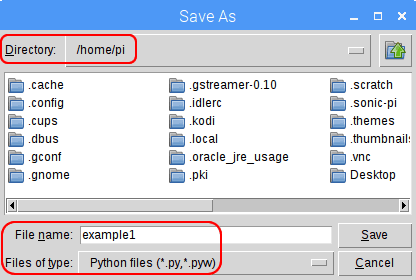
Once the example is keyed into the file, click the File menu, then Save. The "Save As" window will show the directory where your file will be saved and ask for the File name. Enter something like example1 for the file name and then click the Save button. Python files are saved with the .py extension - so, this file will be saved as example1.py .
Save Python file screen
Run the program by clicking the Run menu, then Run Module (or just press F5). The program will run in the Python Shell.
Running a program from the Python Shell is handy while developing and testing - add code, try, refine and test again.
Run Python file screen
Run Source File from command Terminal
To run the above source file from the command Terminal instead of the Shell, start by launching the command Terminal from the Raspbian Accessories menu. By default, the window will open to the /home/pi directory. You can see your example1.py source file by listing the directory with the ls (lower case L) command.
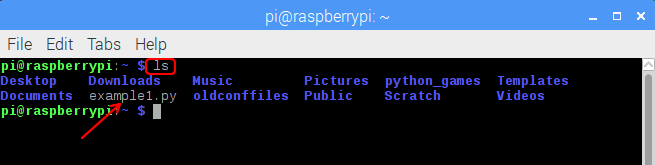
Command Terminal with ls command
Run your example1.py program with the following command: python3 example1.py

Run example1.py from Terminal
That's it! You can now create, save and run a Python source file. Let's move on to some of the Python coding basics.
Python Code Basics
In this section, we will cover some of the basic terms and constructs of Python.
Comments
Comments are very useful for clarifying and documenting the parts and purpose within any program. This is especially true when looking at code sometime later or by another programmer.
Python uses the "#" sign, also known as the hash or pound sign, to designate lines as comments and not executable code.
Our while loop code from above example with comments:
# Create variable x and assign 0 to its initial value
x = 0
# Loop 20 times, from 0 to 19 (x starts at 0)
# Print x, increment x by 1 and loop again
while x < 20 :
    print(x)
    x = x + 1
print("All done!")
# The last print line must be outdented so it is not included in while loop
Variables and Data Types
All programming languages use variables. Variables are used to hold information while processing and are given symbolic names so they can be referenced within the program. For example, a variable called name might be used to store the name of a person. A variable called num1 might be used to store a number for use in a calculation.
Variables are categorized by Data Type. Two common Data Types in Python include Strings and Numbers. A string data type can hold a series of characters, or words and even whole sentences. There are several Number data types including integers (whole numbers) and floats (numbers with decimals).
Typically, variables are assigned values from strings, literal numbers, calculations, inputs and other functions. These variables can change, or assigned new values, within the program.
Some examples of strings (note the quotes around the strings):
- "Jason"
- "Automobile"
- "Raspberry Pi computer board"
Examples of integers
- 17
- 53217
- -728
Examples of floats
- 17.82
- 53217.127
- -728.3145
Examples of variables used in Python code:
name = "Jason"
car = "Ford"
computer = "Raspberry Pi"
num1 = 17      # integer
num2 = 17.82   # float
num3 = num1 + 10
if computer == "Raspberry Pi"
   print("I love my Pi!")
Operators and Operands
Operators
Operators are special characters or symbols that represent an action to be taken within a Python statement. Examples: - + / * = == < >
| Operator | Function | Example |
|---|---|---|
| - | Subtraction | 5 - 3 |
| + | Addition | 18 + 4 |
| / | Division | 9 / 3 |
| * | Multiplication | 10 * 2 |
| > | Greater than | 20 > 15 |
| < | Less than | 5 < 10 |
| == | Equal to | a === b |
| != | Not equal to | a != b |
| and | Logical and | if a == b and c == d : |
| or | Logical or | if a == b or c == d : |
Operator Precedence
In mathematics, there is an order, or precedence, that operators within a formula are performed. The same is true in programming. Multiplication and division are performed before addition and subtraction, for example. It is important to know this precedence when programming calculations.
The following table shows some of the more common operators and their precedence. There are many more operators in Python, but these are some of the more widely used. Those higher in the table are processed before those lower in the table.
| Operator | Description |
|---|---|
| ( ) | Parentheses |
| ** | Exponent |
| +x -x | Positive or negative variables |
| * / | Multiplication and division |
| < <= > >= <> != == | Comparisons |
| and | Boolean AND |
| or | Boolean OR |
Operands
The parts of a Python statement that contain data or information (the literals and variables) which are acted upon by the operators, are called operands.
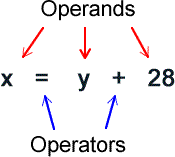
Example of Operators and Operands
If Else Statements
If Else constructs are called conditional statements. They start with if followed by a conditional test, that if true, the indented code below will run, otherwise it will not. Example:
if  10  >  5 :
    print(10 is greater than 5)
The optional else can be added to perform some function when the condition of if statement is not true (false). Example:
if  5  >  10 :
    print(5 is greater than 10)
else :
    print(5 is not greater than 10)
Note the : at the end of the if and else statement. This is a required part of the syntax for if and else.
While and For Loops
Often a programming "loop" is required to perform repeated steps, or iterations, of a block of code. Examples would include incrementing a counter for use in a calculation, or printing multiple rows of data or information from a list, or repeatedly checking for input from a keyboard.
While Loop
The while loop will repeat as long as the conditional test on the while line is true. Once it is false, the code will fall through past the while loop block of code.A simple While loop might look like this:
num1 = 1
while num1 < 11 :
    print(num1)
    num1 = num1 + 1
This code sets a variable called num1 to 1. The while loop repeatedly prints num1, adds 1 to num1 and then repeats the loop until num1 increases to 11 at which point the conditional test num1 < 11 is false and the while loop stops looping. Again, note the : at the end of the while line.
For Loop
The For loop is designed to repeat a block of code while processing a list of elements or for a specific number of times based on a range. Each loop is called an iteration. Some examples:
# Set x to 1 and then print x in a loop until x sequences from 1 through 10 (it stops when x reaches 11 in the range).
for x in range(1, 11) :
    print(x)
# Create a list of names, then use For loop to iterate through each and print the name.
names_list = ["Jason", "Elly", "Sarah", "Sean"]
for name in names-list :
    print(name)
The "names_list" variable is called a list in Python and in this example it is a list of type string. In the first line we assign a list of four names to names_list. Then we run a for loop to iterate through each name in the list, assign it to variable name and print the name.
Summary
Let's put it all together. Python is a great language for learning to program. But, it is not a limited "beginners" programming platform. In fact, many large-scale and complex programs are not only possible, but very practical. It is used regularly in business applications, scientific computing, artificial intelligence, "big data" processing, machine learning, web development, education and many commercial industries.
For our purposes, it is ideal for working with the Raspberry Pi. There is considerable support, information and wide availability of libaries to do almost anything you can think of with this little computer board called the Raspberry Pi.
There is a lot more to Python than this article demonstrates, but as an "introduction" and for the sake of brevity, this is a start. Go forth and program!
# A recap of some Python code based on segments of this article.
print("Hello World - I love Python")
Hello World - I love Python

x = 15
y = 20
print(x + y)
35

while x < 20 :   # x is still set to 15
    print(x)
    x = x + 1    # increment x by 1
15
16
17
18
19

# 2 * 4 has precedence and is done before adding the first 2.  Result will be equal to 10 (not 16).
result = 2 + 2 * 4
if result == 10 :
  print("Result is equal 10")
else :
  print("Result is not equal 10")
Result is equal 10

prime_numbers = [2, 3, 5, 7 , 11, 13]   # Only the 1st 6 primes
for prime in prime_numbers :
    print(prime)
2
3
5
7
11
13


